
Many of our items are made to order using the specifications you provide. We have included detailed instructions on how to obtain accurate measurements but if you have any questions, please contact us for assistance. Here are some general guidelines for getting the best possible measurements:
- Use a flexible or tailor’s tape measure.
- If you don’t have access to one, you can use a cord or string, mark it with a Sharpie and then measure that length with a regular tape measure.
- If you are obtaining measurements for yourself, have someone assist you.
- Measure 2 or 3 times and average the measurements if they’re different.
- If in doubt, contact us!
RADIO STRAPS
There are 2 measurements we need to customize your radio strap: the Strap Length and Mic Loop Height.
If you want a second Mic Loop, the height is measured exactly the same as if you only wanted one, just provide us with both measurements when you order.
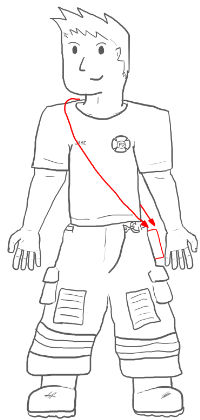
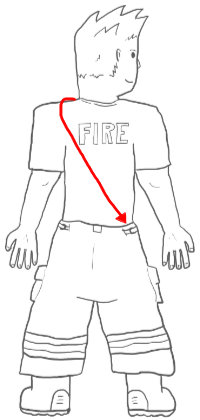
STRAP LENGTH (RED)
This is the total measurements of the strap itself. To obtain this, starting with your hands at your side, measure up across your chest, over your opposite shoulder, across your back and to your side again. Your start and end position will be at the top of where the radio strap ends and the holster begins or roughly where the controls on top of the radio would be. When worn with bunker pants and under the turnout coat, the radio holster itself will sit slightly back behind your hip. Typical measurements here are usually between 57″ and 64″ depending on your torso length.
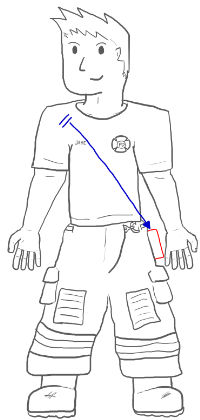
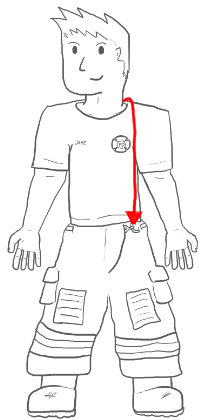
MIC LOOP HEIGHT (BLUE)
This measurement is where you want your mic loop placed. If you want multiple mic loops, measure them all the same way. Starting with the same spot you began with when checking your overall strap length, measure up across your chest and stop where you want the mic loop to be. You may want to experiment a bit with the start position so you get an idea of where your mic loop will be if you push your radio holster more towards your back or more forwards. Avoid placing it too high. Typical measurements here are usually between 18″ and 28″ depending on personal preference and the strap length.
TRUCK BELTS
Truck Belts should be measured for with your turnout gear on. There is only one measurement but accuracy is important. Your measurement will be placed in the center of the range of adjustment unless requested otherwise.
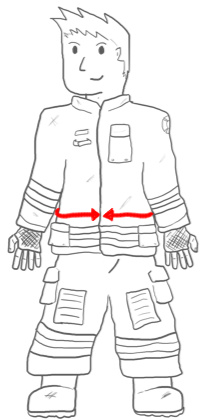
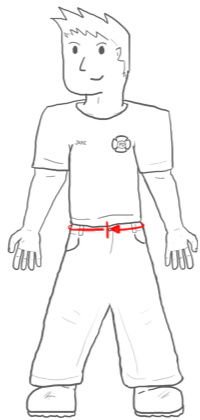
BELT LENGTH (RED)
With your turnout gear ON, measure around your waist, just above your coat pockets (if you have them.) We recommend going slightly larger than what you think you’ll need by 1″. Belts under 42″ will have 5 spots for adjustment, belts 42″+ will have 7 spots for adjustment. This is to ensure attachments can be positioned properly on shorter belts.
Any measurements 38″ and under *OR* 48″ and over are generally verified with the customer as these have the highest instance of being too small or too large on arrival. We do this as a courtesy because we want to ensure you receive a product you can use! These belts are not designed to be worn as “bunker pants belts” and entering your pants size will result in a belt that does not fit properly. Please contact us if you need a belt specifically for your bunker pants; we can accommodate these special requests directly.
We very strongly encourage you to take the time and properly measure yourself. If you have any concerns, contact us for help!
BUNKER BELTS
To measure for Bunker Belts, recommend you remove your original webbing belt, don your Bunker Pants and pass a tailor’s tape through the loops to directly measure your waist. This yields the most accurate measurement.
You can alternatively removed the original webbing belt and measure this with a tape measure. If you measure the original belt this way, please account for the male end of the buckle locking into the female end. If you just measure from tip of the hardware to tip of the hardware, it will be slightly longer than when the two ends are clicked together.
Bunker Belts come either lined with webbing or unlined. Because the lined versions are thicker, you should add 1-2″ to your measurement. So if you measured and came up with 38″, it would be better to order a 39″ or 40″ belt, similar to how we recommend measuring for Truck Belts. Belts under 42″ will have 5 spots for adjustment, belts 42″+ will have 7 spots for adjustment
SQUAD BELTS
Squad Belts should be measured for with your turnout gear on. There is only one measurement but it will need to be taken with your coat on. Your measurement will be placed in the center of the range of adjustment unless requested otherwise.
BELT LENGTH (RED)
With your turnout gear ON, measure around your waist, just above your coat pockets (if you have them.) Squad Belts should fit snug to maintain tool retention.
We very strongly encourage you to take the time and properly measure yourself. If you have any concerns, contact us for help!
BUNKERS SUSPENDERS
‘X’ style suspenders crossover your back, go over the shoulder, and straight down your chest. If you want your suspenders to be adjustable, the measurements you provide will be set in the 3rd spot from the bottom.
SUSPENDER LENGTH (RED)
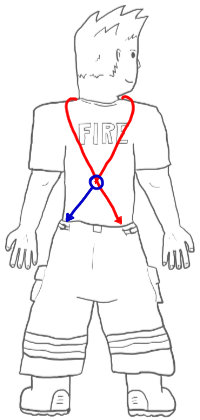
The first measurement is the Suspender Length. Ideally, you should be wearing your bunker pants when taking this measurement and have them set roughly at your preferred height. Start at one of the rear connection points (usually a loop of cloth or a metal button) and measure across your back, over your shoulder, and straight down your front to a connection point on the opposite side from where you started. Leave the tape measure in place after you get this measurement as you’ll need to also check your Crossover Height. Typical measurements here are usually between 45″ to 54″ depending on your torso length.
CROSSOVER HEIGHT (BLUE)
The second measurement is the Crossover Height. This is the point on your back where the two straps cross each other. This point is always right over your spine but the actual height varies a bit depending on how long your torso is. If you still have the tape measure in place from your 1st measurement, great. If not, place it the same way as detailed in the Overall Strap Length. You are measuring from your back connection point to the point where the suspenders would cross your spine. Typical measurements here are usually between 8″ and 15″ depending on your torso length.
BELTS
You measure for our belts like you would any other typical belt. Your measurement will be placed in the center of the range of adjustment unless requested otherwise.
BELT LENGTH (RED)
Simply measure around your waist. Cinch the tape firmly. For the most accurate measurement, feed the tape through your belt loops. This measurement should be in inches, NOT your typical pants size (example: 34, 36, 38).
DOG COLLARS

Collars are created to fit your dog. There are two measurements to be concerned with, the length and the width. Width is a preference and generally doesn’t need to be measured. Most medium to large breed dogs do well with 1-1/2″ collars but you can scale up or down as you like. We wouldn’t recommend anything wider than a 1″ collar for smaller breeds. For length, you’ll need to actually measure your pet.
COLLAR LENGTH (RED)
To measure for the collar length, simply measure around the dog’s neck. You’ll want to make sure the measurement is not overly tight or loose. You should be able to place two fingers between the tape measure and your dog to provide for comfort. The measurement you provide will be placed in the center of the adjustment range for the collar giving you roughly 2″ longer or 2″ shorter.
Some General Sizing Guidelines:
Very Small Dogs (Chihuahua, Maltese) – 8 to 12″ neck
Small Dogs (Cocker Spaniel, Boston Terrier) – 11-16″ neck
Medium Dogs (Beagle, French Bulldog) – 16-20″ neck
Large Dogs (Retrievers, German Shepherd) – 18-24″ neck
X-Large Dogs (Wolfhound, Rottweiler) – 20″-30″
This is just a rough guideline as every dog is different. We strongly encourage you to take the time to properly measure your dog’s neck prior to ordering.